


How to Make Your First Sourdough Starter – No-Fail Method
Sourdough is often seen as mysterious and hard to master, but it is actually simple: a sourdough starter only needs flour, water, time, and patience. No special skills, secrets, or commercial yeast are required. Follow these steps to grow a healthy, active starter.
You may use active dry yeast to speed up the process, or build a starter naturally from wild yeast and bacteria in flour and air. Both methods work well and produce reliable starters.
What Is a Starter
A sourdough starter is a live culture of wild yeast and beneficial bacteria. When flour and water are mixed, microorganisms multiply and form a stable fermenting culture. People have used this method for thousands of years. Your kitchen has everything you need.
Basic Supplies
- Flour (unbleached bread flour or whole wheat works best)
- Room-temperature filtered or boiled water (avoid chlorinated tap water)
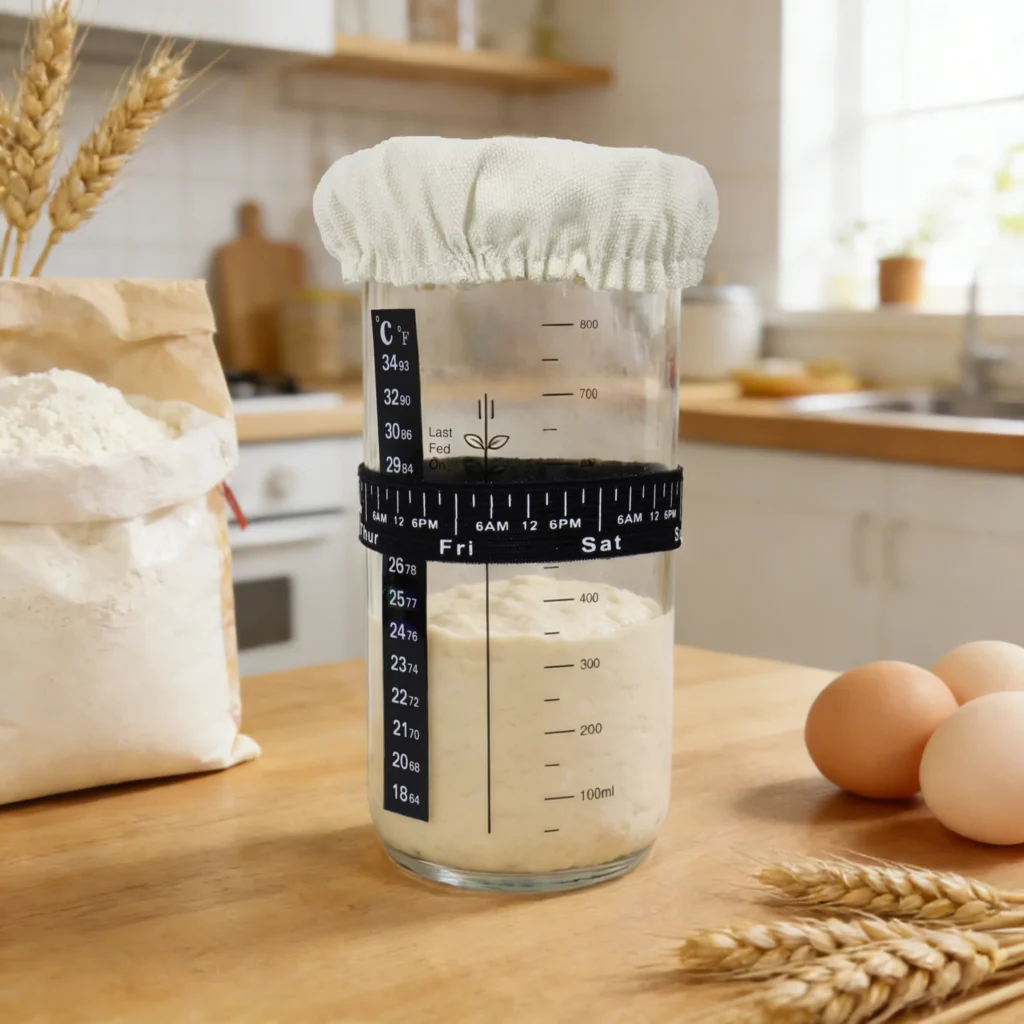
- A clean, marked glass jar
- A warm spot (21–26°C ideal)
Do not worry if your starter seems inactive at first. Microbes grow gradually.
What to Expect in the First Days
Early changes are normal:
- Large bubbles on day 1 that disappear on day 2
- Slightly alcoholic or tangy smell
- Sticky, separated, or uneven texture
These show the microbes are adjusting and balancing. Keep going past this messy phase.
When Your Starter Is Ready
A starter is ready when it shows consistent strong fermentation, usually in 5–7 days.
- Doubling Test: It doubles or triples in 4–6 hours after feeding at 1:1:1 ratio.
- Float Test: A small spoonful floats in water.
- Smell & Texture: Pleasant tangy, fruity, wheaty scent; smooth, bubbly, pourable texture.
It is ready only when all signs are steady.
Every starter is unique. Once active and stable, you will learn its rhythm and make wonderful sourdough bread.